


HZ261 Manual Closed Cup Flash Point Apparatus
Huazheng Electric Manufacturing (Baoding) Co., Ltd. is one of the leading manufacturers and suppliers of hz261 manual closed cup flash point apparatus in China. Please feel free to buy high quality equipment for sale here from our factory. Good service and reasonable price are available.
Manual Closed Cup Flash Point Tester
Product Description
This closed cup flash point tester is designed and manufactured in accordance with GB/T 261 Determination of Flash Point - Pensky-Martens Closed Cup Method. It is applicable to measuring the closed cup flash point temperature of petroleum products-including diesel oil, kerosene, insulating oil, and fuel oil-following the procedures specified in this standard.
Main Parameters
| Item | Specification |
|---|---|
| Power Supply | AC 220V ±10%, 50Hz |
| Temperature Measurement Range | Ambient temperature to 300°C |
| Repeatability | ≤2°C |
| Accuracy | 0.5% FS |
| Heating Rate | Compliant with GB/T 261 |
| Stirring Speed | 100rpm |
| Ignition Mode | Electronic ignition, gas flame length 3–4mm |
| Total Power Consumption | ≤1000W |
| Optional Mercury-in-Glass Thermometers (GB/T 261-2008) | (1) -5°C to 110°C, graduation 0.5°C(2) 20°C to 150°C, graduation 1.0°C(3) 90°C to 370°C, graduation 2°C |
Operation Procedures
1. Pre-Test Preparation
This is an automatically controlled instrument; therefore, read the operation manual thoroughly before use to ensure safe and proper operation. Study GB/T 261 Determination of Flash Point - Pensky-Martens Closed Cup Method to fully master the standard test methods, procedures, and requirements. Prepare all test utensils and materials as required by GB/T 261.
Inspect the instrument to ensure that the working environment meets the specified conditions outlined in this manual. Check the equipment housing for reliable earthing; the power cord must be properly grounded to prevent electrical hazards.
2. Unpacking Inspection
Unpack the instrument and carefully check for any damage that may have occurred during transportation. Verify the instrument model and all accessories against the packing list to ensure completeness. Commission the instrument only after a full inspection confirms that no defects are present.
3. Pre-Operation Setup
Place the instrument on a stable and sturdy workbench that is free from mechanical vibration, corrosive gas, contamination, and electromagnetic interference. Then, connect the power cord.
Connect the gas supply (liquefied petroleum gas is recommended) to the gas inlet via a pressure reducing valve and check for air leakage. Note: this step is not required for the electronic ignition type.
Clean the test cup thoroughly with petroleum ether before beginning any testing.
4. Test Steps
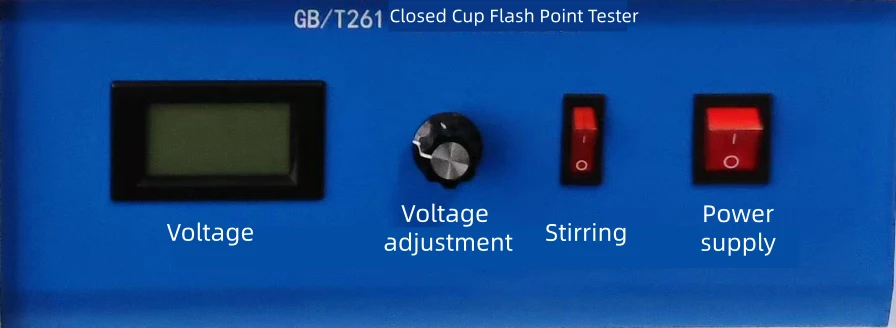
Figure 2 Control Panel
Turn on stirring first, then adjust the voltage knob while observing the voltmeter to control the heating rate in line with GB/T 261 requirements.
Detailed operating steps:
Sample Dehydration – If the water content of the sample exceeds 0.05%, dehydration treatment is mandatory. Add freshly calcined and cooled salt, sodium sulfate, or anhydrous calcium chloride to the sample. No heating is needed for samples with an estimated flash point below 100 °C; heat to 50–80 °C for samples with an estimated flash point above 100 °C. After dehydration, take the upper clear liquid for testing.
Cup Preparation – Wash the oil cup with unleaded gasoline and blow dry with clean air.
Sample Filling – Fill the oil cup with sample; the temperature of the sample and cup shall not exceed the dehydration temperature of the sample. Fill the sample up to the annular mark, fit a clean and dry lid, insert the thermometer, and cool the oil cup in an air bath to ambient temperature (20 ± 5 °C).
Power On – Switch on the heating and stirring power supply.
Heating and Stirring – For samples with a flash point higher than 50 °C, heat uniformly with continuous stirring. When the temperature reaches 40 °C below the expected flash point, adjust the heating rate to 2–3 °C per minute when 20 °C below the expected flash point, and keep stirring throughout.
Ignition Testing – When the temperature is 10 °C below the expected flash point, for samples with a flash point over 104 °C, perform the ignition test every 2 °C. Keep stirring during the whole test except during ignition. For ignition, lower the flame into the vapor space above the cup within 0.5 s, hold for 1 s, and quickly retract to the original position. If no flash is observed, resume stirring and repeat ignition following this clause.
Recording Results – Record the temperature shown on the thermometer immediately when a distinct blue flame first appears above the liquid surface as the flash point test result. After the initial flash, continue ignition per step 6 and consistent flash shall occur. If no secondary flash is observed after the first ignition flash, replace the sample and retest; the test result is valid only if the same phenomenon occurs repeatedly.
Cooling – Turn on the cooling fan for equipment cooling after test completion.
Pressure Correction – Measure the actual atmospheric pressure P (Pa) with a calibrated barometer and calculate the correction value via the corresponding formula.
Company Profile


Hot Tags: hz261 manual closed cup flash point apparatus, China, suppliers, manufacturers, price, for sale
Send Inquiry
